Introduction:
The iPhone has become an integral part of our daily lives, and its battery life is crucial for maintaining its functionality. Over time, the battery may degrade, and users often seek ways to extend their iPhone’s life by swapping the battery. In this article, we will guide you through the process of swapping an iPhone battery using third-party cells, with a focus on soldering temperature curves.

Understanding Soldering Temperature Curves:
Before diving into the battery swap process, it’s essential to understand the concept of soldering temperature curves. Soldering temperature curves provide a visual representation of the ideal temperature ranges for different stages of the soldering process. These curves are crucial for achieving a successful battery swap without damaging the iPhone’s components.
Step 1: Gather the Necessary Tools and Materials
To begin the iPhone battery swap, gather the following tools and materials:
– Third-party iPhone battery
– Soldering iron with temperature control
– Soldering flux
– Soldering tip
– Desoldering braid
– Heat gun or hot air rework station
– Soldering stand
– Screwdriver set
– Anti-static wrist strap
– Isopropyl alcohol and cotton swabs
Step 2: Prepare the iPhone
Before proceeding, ensure that the iPhone is turned off and disconnected from any power source. Place the iPhone on a non-conductive surface and wear an anti-static wrist strap to prevent static discharge.
Step 3: Remove the Battery Cover
Use a screwdriver to remove the screws securing the iPhone’s back cover. Gently pry the back cover off, being cautious not to damage the adhesive holding it in place.
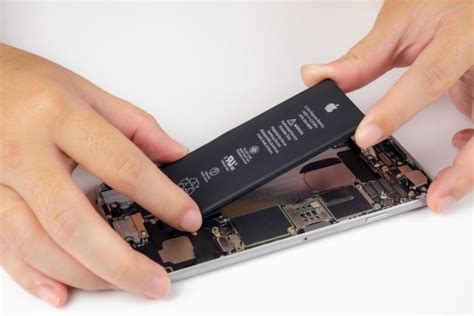
Step 4: Disconnect the Old Battery
Locate the old battery and disconnect it from the iPhone’s internal components. This process may vary depending on the iPhone model. For most models, you will need to desolder the battery’s connection points using the desoldering braid.
Step 5: Solder the New Battery
Now, it’s time to solder the new battery. Follow these steps:
– Clean the battery’s connection points using isopropyl alcohol and cotton swabs.
– Set your soldering iron to the appropriate temperature based on the soldering temperature curve for your specific iPhone model and battery.
– Apply a small amount of soldering flux to the connection points.
– Touch the soldering iron to the connection point and apply a small amount of solder.
– Repeat the process for all connection points on the new battery.
Step 6: Verify the Battery Connection
After soldering the new battery, inspect the connections to ensure they are clean and secure. Use the heat gun or hot air rework station to check for any cold joints or soldering issues.
Step 7: Reassemble the iPhone
Now that the new battery is soldered in place, reassemble the iPhone by reversing the disassembly steps. Ensure that all components are correctly aligned and that the back cover is securely fastened.
Conclusion:
Swapping an iPhone battery using third-party cells can be a rewarding DIY project. By following this guide and paying close attention to the soldering temperature curves, you can successfully replace your iPhone’s battery and extend its lifespan. Always exercise caution when working with electronic devices and consult professional assistance if you’re unsure about any step in the process.