Introduction:
Undervolting a GPU can be a thrilling experience for enthusiasts and gamers looking to squeeze out every bit of performance from their hardware. In this guide, we will delve into the process of undervolting the NVIDIA GeForce RTX 4090, focusing on voltage-frequency curve optimization. By carefully adjusting the voltage and frequency settings, you can achieve higher performance with reduced power consumption and heat output. Let’s get started!

1. Understanding the RTX 4090 GPU:
Before diving into undervolting, it’s essential to have a basic understanding of the RTX 4090 GPU. This high-end graphics card boasts an impressive 16384 CUDA cores, 12GB of GDDR6X memory, and a wide range of features. However, it also consumes a significant amount of power and generates considerable heat.
2. Tools and Requirements:
To undervolt the RTX 4090, you will need the following tools and requirements:
– NVIDIA GeForce RTX 4090 GPU
– Motherboard with sufficient power delivery and cooling capabilities
– Custom BIOS or a compatible third-party utility
– Overclocking software (e.g., MSI Afterburner, EVGA Precision X)
– A stable power supply with adequate headroom
– A reliable cooling system to manage increased heat output
3. Preparing for Undervolting:
Before starting the undervolting process, ensure that your system is stable and all components are compatible. Update your graphics driver to the latest version to ensure optimal performance and stability. Additionally, make sure your power supply and cooling system can handle the increased load.
4. Accessing the Voltage-Frequency Curve:
To undervolt the RTX 4090, you need to access the voltage-frequency curve. This can be done using a custom BIOS or a third-party utility like MSI Afterburner or EVGA Precision X. Follow these steps to access the curve:
a. Launch the overclocking software of your choice.
b. Navigate to the “Overclocking” or “Undervolting” section.
c. Locate the “Voltage-Frequency Curve” option.
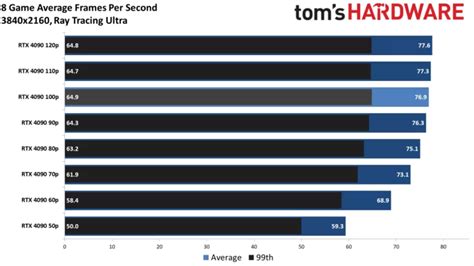
5. Voltage-Frequency Curve Optimization:
Once you have access to the voltage-frequency curve, follow these steps to optimize it:
a. Select the “Manual” or “Custom” mode.
b. Adjust the voltage and frequency settings according to your preferences and system stability.
c. Start with a conservative approach, gradually increasing the voltage and frequency while monitoring your system’s stability and performance.
d. Use the software’s built-in stability tests (e.g., OC Scanner) to ensure your GPU remains stable under the new settings.
6. Monitoring and Adjusting:
After applying the undervolt settings, closely monitor your system’s performance and stability. Pay attention to the GPU temperature, fan speeds, and overall system stability. If you encounter any issues, such as crashes or instability, revert to the previous settings and adjust accordingly.
7. Benefits and Risks:
Undervolting the RTX 4090 can offer several benefits, including:
– Reduced power consumption and heat output
– Improved performance under specific workloads
– Longer lifespan of the GPU due to lower operating temperatures
However, it’s important to note the risks involved:
– System instability and crashes
– Potential damage to the GPU or other components
– Voided warranty
Conclusion:
Undervolting the NVIDIA GeForce RTX 4090 can be a rewarding endeavor, allowing you to extract additional performance with reduced power consumption and heat output. By carefully optimizing the voltage-frequency curve, you can achieve a stable and efficient system. However, proceed with caution, as undervolting carries certain risks. Always monitor your system’s stability and performance, and revert to safer settings if any issues arise. Happy undervolting!